Absolutely stoked to see you here! This is part three of my four-part guide for building a simple blog app using the Django web framework.
Outline
Part 1: Initializing your Django application
Part 2: Creating the Django application interface
Part 3: Getting data from Django forms ⬅️ You are here!
- Create the Django form for the model.
- Link the form to its corresponding views and templates.
- Enable user authentication.
- Make the site navigation better.
- Create the base template for all templates.
Part 4: Deploying your Django app
1. Create the Django form for the model.
These are the final features for your site: creating and editing blog posts. For these to work, you will need to create forms. Note that you can do these things from scratch, but for this guide, we’ll use the Django form. Let’s go ahead and make that.
- Django forms have their own file. Create a file named
forms.pyinsidemysite/blog.blog └── forms.py - This form will be concerned with the
Postmodel. Open the file and write the following code.from django import forms from .models import Post class PostForm(forms.ModelForm): class Meta: # Tell Django which model is to be used to create the form model = Post # Enumerate the fields that should be present in the form. fields = ('title', 'text')
2. Link the form to its corresponding views and templates.
Let’s link the form to the last two views and templates, post_new and post_edit. Going back to our table from part two, both views handle two types of request: GET and POST. If the request is a POST request, then it contains the data submitted from the user. The post_new and post_edit views should get this data, create or edit post through the Django form, and redirect it to the post page of the newly created or edited post. Otherwise, it should generate a new PostForm and render the new post page that has the form.
- Go ahead and include the
PostFormyou just created as well as theredirectshortcut inviews.py. Then redefine thepost_newview.# Import PostForm and redirect shortcut first import .forms import PostForm import django.shortcuts import redirect # ... def post_new(request): if request.method == "POST": # Get form data from request. form = PostForm(request.POST) # Check validity of form. if form.is_valid(): post = form.save(commit=False) # This returns a Post model. post.author = request.user post.published_date = timezone.now() post.save() # Redirect to the newly created post's page using post_detail view.. return redirect('post_detail', pk=post.pk) else: # Initialize form. form = PostForm() # Go to new post page with the empty form. context = { 'form' : form } return render(request, 'blog/post_new.html', context) -
Now is the time to put something in the
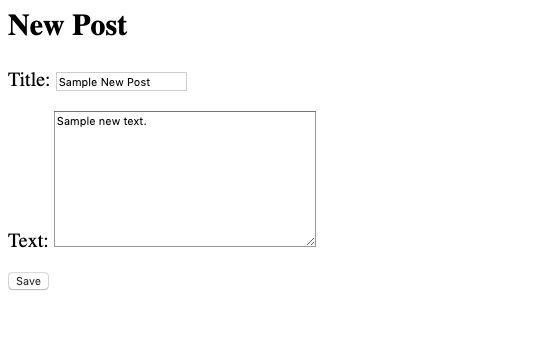
post_new.htmltemplate. Go ahead and do that. In here we use the HTML form and add the{% csrf_token %}tag for security.<h2>New Post</h2> <form method="POST" class="post-form"> {% csrf_token %} {{ form.as_p }} <button type="submit" class="save btn btn-default">Save</button> </form> - Okay let’s do a quick check up. Visit the new post page and submit a new post through the URL
localhost:4000/post/new/.Rendering post_new template at
localhost:4000/post/new/
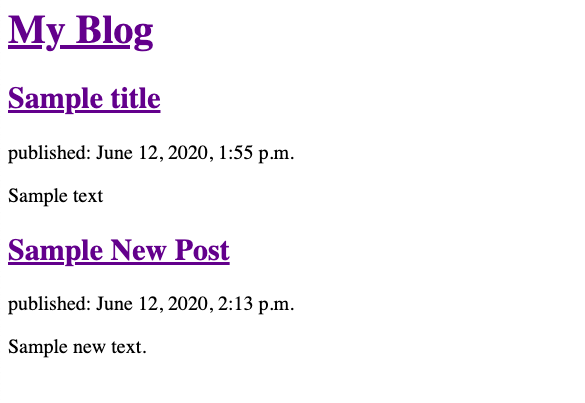
- Go back to the index page and you should see your new post.
New post in post_list template at
localhost:4000/
- Finally, redefine the
post_editview in the same way you did forpost_new. Because you are to modify an existing post, add theinstance=postargument whenPostForm()is called.def post_edit(request, pk): # Check if there really is an object with the pk. post = get_object_or_404(Post, pk=pk) # When submitting edited Post: if request.method == "POST": # Add instance=post argument. form = PostForm(request.POST, instance=post) if form.is_valid(): post = form.save(commit=False) post.author = request.user post.published_date = timezone.now() post.save() # Go to edited post page. return redirect('post_detail', pk=post.pk) # When about to edit a Post: else: # Load form with current instance of post. form = PostForm(instance=post) # Render post_edit with the form containing current instance of the Post. return render(request, 'blog/post_edit.html', {'form': form}) -
Put this in the
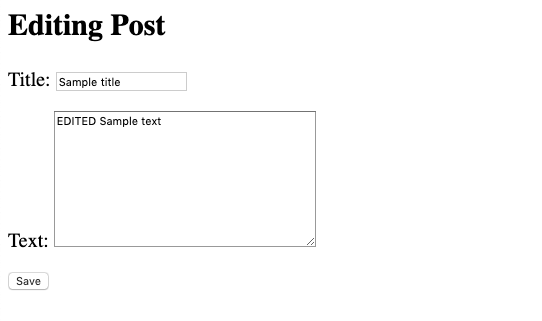
post_edit.htmltemplate.<h2>Editing Post</h2> <form method="POST" class="post-form"> {% csrf_token %} {{ form.as_p }} <button type="submit" class="save btn btn-default">Save</button> </form> - Try editing your very first Post by appending a
/editto the post_page URL of any post.Rendering post_edit template at
localhost:4000/post/1/edit
- Go back to the index page and you will see the posts are updated. Now, you don’t see any link from any view going to the new post page or the edit post page. Let’s do that in the next steps.
3. Enable user authentication.
You’ve now completed the blog’s features. Now, think about restricting some of it. You couldn’t let just anyone create new posts and edit previous posts on your site. You need to authenticate the user first. How do we restrict the use of these features?
- You already created your first user using
createsuperuserfrom part one. What you need to do now is to set up the login page. First, add Django site authentication urls inmysite/urls.py.path('accounts/', include('django.contrib.auth.urls')), -
The good thing with including
django.contrib.auth.urls. is that Django will set things up for you which include: login, logout, and password management. The next thing that you have to do is to create a template for the login page. Create a new folder under thetemplates/folder namedregistration/and create a new file calledlogin.html. Put this in it to create a simple login page.{% if form.errors %} <p>Your username and password didn't match. Please try again.</p> {% endif %} {% if next %} {% if user.is_authenticated %} <p>Your account doesn't have access to this page. To proceed, please login with an account that has access.</p> {% else %} <p>Please login to see this page.</p> {% endif %} {% endif %} <form method="post" action="{% url 'login' %}"> {% csrf_token %} <table> <tr> <td>{{ form.username.label_tag }}</td> <td>{{ form.username }}</td> </tr> <tr> <td>{{ form.password.label_tag }}</td> <td>{{ form.password }}</td> </tr> </table> <input type="submit" value="login" /> <input type="hidden" name="next" value="{{ next }}" /> </form> - Now you need update the
TEMPLATESsection inmysite/settings.pyand put the template directory of your project to make all its templates visible to the template loader.TEMPLATES = [ { ... 'DIRS': [os.path.join(BASE_DIR, 'templates')], ... - Next is to tell Django where to redirect after logging-in and out. Do that through adding this line in
settings.py.# Redirect to home URL after login/logout (Default redirects to /accounts/profile/) LOGIN_REDIRECT_URL = '/' LOGOUT_REDIRECT_URL = '/' -
Finally restrict some of the site’s features. Go to
views.py. Importlogin_requiredfromdjango.contrib.auth.decoratorsand add the following line beforepost_editandpost_new.from django.contrib.auth.decorators import login_required ... @login_required def post_edit(request, pk): ... @login_required def post_new(): ... - Okay, now try testing it through these URLs:
localhost:8000/accounts/login/localhost:8000/accounts/logout/
4. Make the site navigation better.
It would be best to add a link to the new post page in the index page. A link would suffice but let’s try and make it look prettier. Let’s make use of Bootstrap and add a navigation bar with a button for creating a new post at the home page, as well as a footer at the bottom of the page.
- Open the
post_list.htmltemplate and add the following code just before the<body>tag.<head> <title>My Blog</title> <!-- Bootstrap --> <link rel="stylesheet" href="//maxcdn.bootstrapcdn.com/bootstrap/3.2.0/css/bootstrap.min.css"> <link rel="stylesheet" href="//maxcdn.bootstrapcdn.com/bootstrap/3.2.0/css/bootstrap-theme.min.css"> </head> -
To add a simple navbar, add the following code. Put the buttons linking to the new post page, login, and logout. If the user is logged in, provide buttons to create new post and to logout. Otherwise, provide a button for loggin in.
<!-- Nav Bar --> <nav class="navbar navbar-inverse navbar-fixed-top"> <div class="container-fluid"> <div class="navbar-header"> <a class="navbar-brand" href="/">My Blog</a> </div> <!-- Add button here. --> {% if user.is_authenticated %} <a href="{% url 'logout' %}"> <button class="btn navbar-btn btn-danger navbar-right">Log Out</button> </a> <a href="{% url 'post_new' %}"> <button class="btn navbar-btn navbar-right">New Post</button> </a> {% else %} <a href="{% url 'login' %}"> <button class="btn navbar-btn navbar-right">Log-in</button> </a> {% endif %} </div> </nav> <!-- Nav Bar --> - Now let’s add the footer just before the closing tag for body.
<!-- Footer --> <footer class="page-footer font-small black"> <!-- Copyright --> <div class="footer-copyright text-center py-3">© 2020 Copyright: <a href="https://jennieablog.github.io/"> jennieablog</a> </div> <!-- Copyright --> </footer> <!-- Footer --> - Reload the page and you should see the changes.
5. Create the base template for all templates.
Notice that it doesn’t look good enough yet since the navbar is covering some elements. Also notice that if you click new post, the nav bar and footer disappears. To solve these issues, you will have to create a base template.
-
Under the templates folder, create a file called
base.htmland cut-and-paste in the code for the navigation bar and footer frompost_list.html.base.htmlshould have this.<html> <head> <title>My Blog</title> <!-- Bootstrap --> <link rel="stylesheet" href="//maxcdn.bootstrapcdn.com/bootstrap/3.2.0/css/bootstrap.min.css"> <link rel="stylesheet" href="//maxcdn.bootstrapcdn.com/bootstrap/3.2.0/css/bootstrap-theme.min.css"> </head> <body> <!-- Nav Bar --> <nav class="navbar navbar-inverse navbar-fixed-top"> <div class="container-fluid"> <div class="navbar-header"> <a class="navbar-brand" href="/">My Blog</a> </div> <!-- Add button here. --> {% if user.is_authenticated %} <a href="{% url 'logout' %}"> <button class="btn navbar-btn btn-danger navbar-right">Log Out</button> </a> <a href="{% url 'post_new' %}"> <button class="btn navbar-btn navbar-right">New Post</button> </a> {% else %} <a href="{% url 'login' %}"> <button class="btn navbar-btn navbar-right">Log-in</button> </a> {% endif %} </div> </nav> <!-- Nav Bar --> <!-- Content --> <div class="content container" style="padding-top: 12rem"> <div class="row"> <div class="col-md-8"> <!-- This is where django puts the content --> {% block content %} {% endblock %} </div> </div> </div> <!-- Content --> <!-- Footer --> <footer class="page-footer font-small black"> <!-- Copyright --> <div class="footer-copyright text-center py-3">© 2020 Copyright: <a href="https://jennieablog.github.io/"> jennieablog</a> </div> <!-- Copyright --> </footer> <!-- Footer --> </body> </html> -
How is this going to work? Go to the other templates and add the following lines of code.
<!-- First Line --> {% extends 'blog/base.html' %} {% block content %} <!-- PUT THE ORIGINAL CONTENT HERE --> {% endblock %} - Click the New Post button or any post in the index page and you should still see the nav bar and footer.
Rendering new post_list with new base template
localhost:4000
-
Finally let’s add an edit button to the posts just beside the post title. Again, this must only be available for logged-in users only. Go ahead and edit
post_detail.html.{% extends 'blog/base.html' %} {% block content %} <h2> {{ post.title }} {% if user.is_authenticated %} <a class="btn btn-default" href="{% url 'post_edit' pk=post.pk %}"><span class="glyphicon glyphicon-pencil"></span></a> {% endif %} </h2> <div class="date"> {{ post.published_date }} </div> <p>{{ post.text|linebreaksbr }}</p> </div> {% endblock%} - Test the edit feature by clicking the button, and that’s it!
Rendering post_detail with base template at
localhost:4000/post/1/
Great job! 🥳
Hey, you’re simply amazing for making it this far. By now you should be able to run a functional blog site. On the next and final part, you will finally see what you made live on the internet. Click here to proceed!